
DIY Posable Pickett the Bowtruckle

*This post from June 2017 has been relocated from my old blog! I've seen it floating around on Pinterest from time to time. Since that link was no longer active I thought I should re-upload it here. These bowtruckles are still floating around my plants like little nature spirits*
If you are like me, you may have watched Fantastic Beasts and Where to Find Them and immediately thought to yourself that you wish you could have a bowtruckle friend of your own. After turning to the internet to solve all of my problems, I was in shock that there was little Fantastic Beasts merch, and no licensed poseable bowtruckle toy available on the market.
Alas, I found a few high priced bowtruckles made from Sculpey for sale on Etsy, some Sculpey DIY tutorials on YouTube, and a kids DIY projects made out of pipe cleaners on Pinterest.
After seeing the pipe cleaner project, I thought to try floral wire and floral tape instead and share my process and results.


You will need:
- Floral Wire, sculpting wire, or any flexible but not too thin/flimsy wire
- Floral Tape
- Needle Nose Pliers
- Fake Leaves - I pulled mine off of a bouquet of fake flowers that I already owned
- Black Paint - I used black fabric puffy paint

Start making your bowtruckle's bones out of wire. This is where you'll determine the size of your bowtruckle. The first one that I made turned out to be much larger than I intended, so I was more careful to make this second guy is about half the size so he was more pocket friendly. This is where the needle nose pliers come in, to help bend and wrap the wire until the desired shape is achieved. Because my leaves were a connected set of two with a loop in the center, I wrapped my wire through it for extra security. I also bent the wire around the eyes (think like snail eyes) to help shape his head out later.

Wrap your wire skeleton with floral tape flesh. In case you have never touched floral tape before in your life, floral tape sticks to itself when stretched. I found that it was easiest to work with smaller sections of tape rather than the whole roll and stretch as I wrapped. My tape kept ripping because I was stretching it too hard, but I'd just stick that edge down as best as I could and wrap right over it with a new piece. Build up areas that you want wider with extra tape.
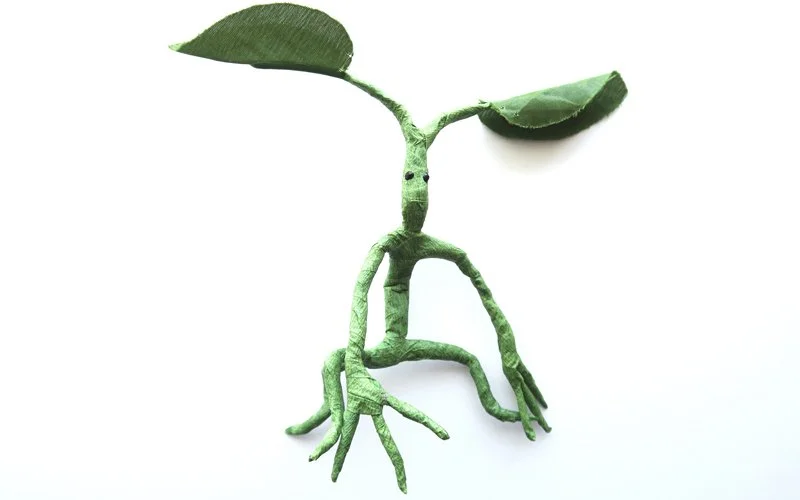
Dot some black beady little eyes on with puffy paint and let it dry for the recommended time (mine was 24 hours). You could also use acrylic paint, or even just sharpie dots if you'd like, but I went with fabric puffy paint so it would stick out a little for a more 3D bug-eyed effect.
They might feel a bit sticky for a while, but that will either wear off with time, or you could lightly dust your new friend with baby powder.

You now have a fantastic beast to go on adventures with. This guy may not be able to pick locks for you, but mine did get me a few compliments and recognition at The Wizarding World of Harry Potter.
Best Witches,
Xristi
